You are now here: Setup>Settings>Invoices
Ok, now this is the general setup page where all your invoices will be configured.
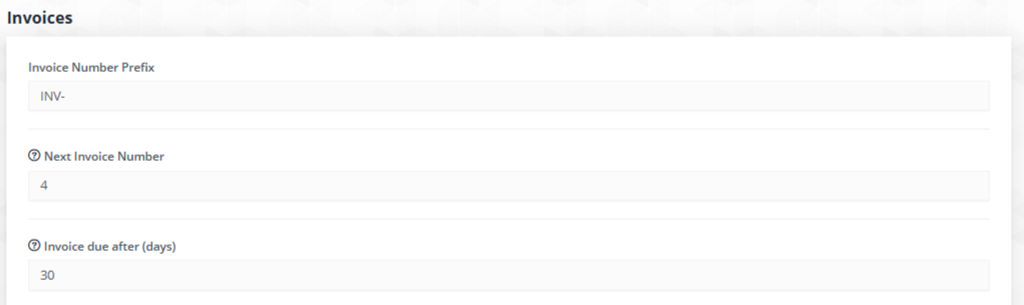
- To start with, you need to clearly identify how an invoice will be named—a prefix. So we have the standard prefix INV – , which you can change it to anything you need.
2. Then you need to specify at which number your invoices will start counting. So if you have already issued invoices before switching to Intellent CRM, you most likely need to find the latest invoice you sent, and write the NEXT number on the field “Next Invoice Number”.
3. The next important thing is when you need to get paid. This means that the Intellent CRM will immediately send a reminder email (which you can edit, obviously) when the specified period has passed.
See below for fields 1, 2 and 3 above:
Now the next three selections are crucial from an administrator type of view.
4. Do you want to Allow staff members to view invoices where they are assigned to or you want staff to see every invoice? Select Yes, for the first, No for the second option.
5. Do you Require client to be logged in to view invoices? From a user experience perspective, it is best if, when you send an invoice to customers, they can see it online, without them taking the time to find their user name and password, log in and then view it.
6. Now, how do you want to handle deleting invoices? Everyone makes mistakes, so sometimes, you have to delete them. From a security perspective, you only want to delete the LAST invoice you issued to avoid having someone or you – by accident or malice – to start deleting past invoices. So you want to select Yes, in the option Delete invoice allowed only on last invoice

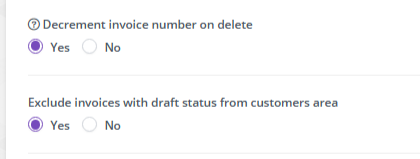
7. Now, the next step is connected to the previous one. If you delete an invoice, how do you want IntellentCRM to handle the numbering on the invoice? So, let’s say that you issued Invoice #15 and you made a mistake, or the client cancelled or your boss decided not to sell or whatever. If you delete the invoice, do you want the number to remain and then the next invoice will be nr. 16 (which doesn’t make sense, but we have it anyway) or do you want the number to decrease (aka, lower to the previous number, so the next invoice you issue is numbered #15 and not #16.
Makes sense? Select Yes, if you want to Decrement invoice number on delete and No, if you want the next invoice to be the next number from the invoice you deleted (see above).
8. Do you want to Exclude invoices with draft status from customers area? Obviously yes, in my opinion you do not want customers to see draft invoices you created. So in my opinion, select the Yes.
See screenshots for options 7 and 8 above, below:
Now the next options:
- Show Sale Agent On Invoice
- Show Project Name On Invoice
- Show Total Paid On Invoice
- Show Credits Applied On Invoice
- Show Amount Due On Invoice
are self-explanatory and there is no need to explore any further.
However the next ones:
9. Attach invoice PDF when sending payment receipt to email: this means, if you want for Intellent CRM to autogenerate an invoice in PDF and attach it automatically on the confirmation email it sends. Now, what you need to pay attention to is that if you have never emailed the customer from your account (i.e. let’s say you act as an admin or accountant and your boss is asking you to send the invoice to the customer HE has emailed) then chances are the attachment will be blocked by spam filters. So my recommendation is to select “NO”:

Now the next one is how you want your Invoice Number Format to appear, so this is self explanatory. I typically go with the last option, which makes searching them easier, but you can select just numbers based.

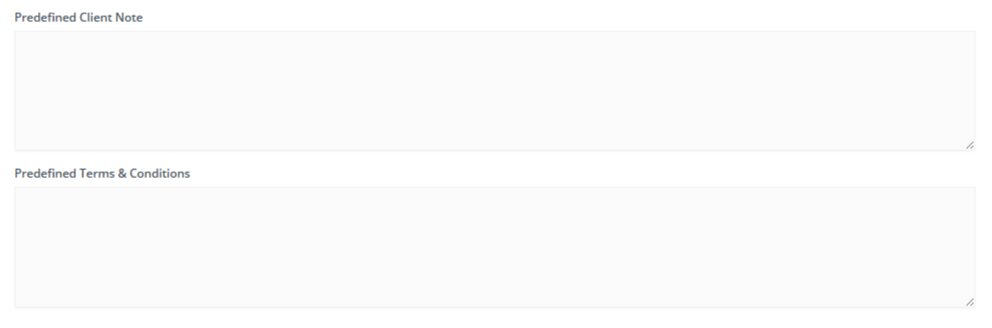
Finally, you have the option to write predefined messages on the invoice, like “Thank you for your business” and predefined terms like “This product is covered by a 30-day money back guarantee”
And with that, we have finished the Invoices section. Next is the Proposals section.


Add a Comment
You must be logged in to post a comment